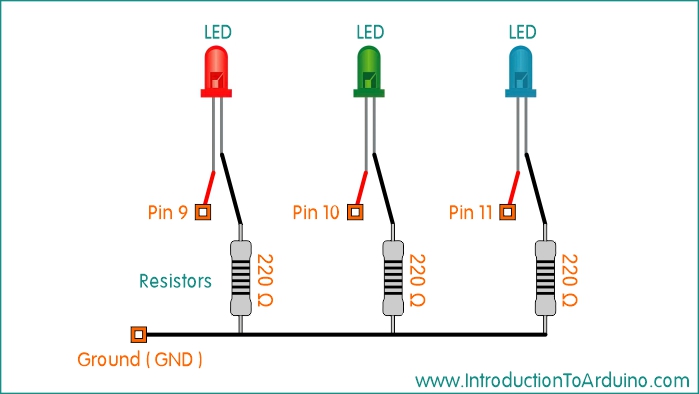
We will be using 3 pins for this project (one for each LED), and a common ground pin for all 3 LEDs. Make sure the long lead on the LED is connected to the numbered pins; LEDs are directional and won’t work if these connections are reversed (short side goes to the ground). You will be able to change the flashing speed of each LED independently by changing the "delay" values.
3 220 Ohm resistors (anything around that value will work) 1 Arduino UNO R3 1 Breadboard Connector Wires
Code:
//------------- Code Starts Here ----------------------------

//-----------------------------------------
//Published by IntroductionToArduino.com
//Created by Paul Illsley (www.paulillsley.com)
//Please use and share so others can enjoy
//-----------------------------------------

// defining names for UNO pins
#define LED_A 9
#define LED_B 10
#define LED_C 11

void setup()
{
  // declaring LED_A (pin 9), LED_B (pin 10) and LED_C (pin 11) are all output pins
  pinMode(LED_A, OUTPUT);
  pinMode(LED_B, OUTPUT);
  pinMode(LED_C, OUTPUT);
}
void loop()
{
  // turning LED_A on (HIGH) and leaving all other pins off (LOW)
  digitalWrite(LED_A, HIGH);
  digitalWrite(LED_B, LOW);
  digitalWrite(LED_C, LOW);

  // delaying 1000 milliseconds (1 second)(you can adjust this value)
  delay(1000);

  // turning LED_B on (HIGH) and leaving all other pins off (LOW)
  digitalWrite(LED_A, LOW);
  digitalWrite(LED_B, HIGH);
  digitalWrite(LED_C, LOW);

  // delaying 1000 milliseconds (1 second)(you can adjust this value)
  delay(1000);

  // turning LED_C on (HIGH) and leaving all other pins off (LOW)
  digitalWrite(LED_A, LOW);
  digitalWrite(LED_B, LOW);
  digitalWrite(LED_C, HIGH);

  // delaying 1000 milliseconds (1 second)(you can adjust this value)
  delay(1000);
}
//------------- Code Stops Here ----------------------------
Return to www.introductiontoarduino.com
|