1 Small Piezo Buzzer 1 Arduino UNO R3 1 Breadboard Connector Wires
Code:
//------------- Code Starts Here ----------------------------
//-----------------------------------------
//Published by IntroductionToArduino.com
//Created by Paul Illsley (www.paulillsley.com)
//Please use and share so others can enjoy
//-----------------------------------------
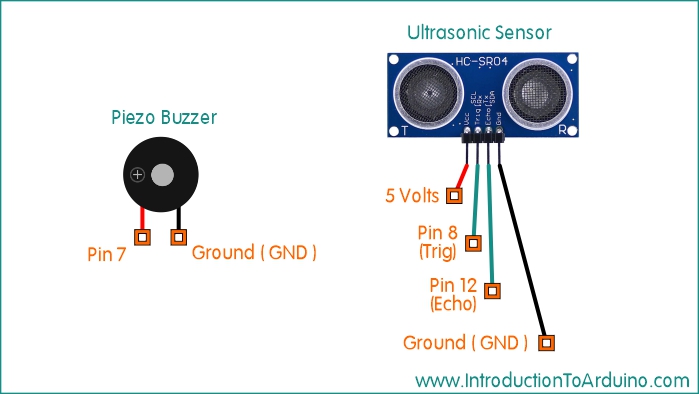
// Declaring pin 8 as the ultrasonic sensor's trigger pin (integer)
int trigger_pin = 8;
// Declaring pin 12 as the ultrasonic sensor's echo pin (integer)
int echo_pin = 12;
// Declaring pin 7 as the buzzer pin (integer)
int buzzer_pin = 7;
// Creating a variable to hold the ultrasonic sensor's data stream (floating point)
float RawData;
// Creating a variable to hold information for the data smoothing process
// A 0 value is required to start the process (floating point)
float OldRawData = 0;
// Creating a variable to hold the filtered (smoothed) data (floating point)
float FilteredData;
// Creating a variable to hold the Distance value (floating point)
float Distance;
void setup()
{
// Begin serial port at a baud rate of 9600
Serial.begin (9600);
// Setting the trigger pin as an output
pinMode(trigger_pin, OUTPUT);
// Setting the echo pin as an input
pinMode(echo_pin, INPUT);
// Setting the buzzer pin as an output
pinMode(buzzer_pin, OUTPUT);
}
void loop()
{
// Setting the trigger pin to low
digitalWrite(trigger_pin, LOW);
// delay 1 microseconds
delayMicroseconds(1);
// Setting the trigger pin to high
digitalWrite(trigger_pin, HIGH);
// delay 5 microseconds
delayMicroseconds(5);
// Setting the trigger pin to low
digitalWrite(trigger_pin, LOW);
// Populating the RawData variable with the echo data from the ultrasonic sensor
// Values are milliseconds between the time the sound pulse left the transmitter and returned back to the receiver
RawData = pulseIn(echo_pin, HIGH);
// Calculating the Distance (cm) from the semsor
Distance = RawData * 0.034 / 2;
// Filter the RawData to help create a smoother data flow.
// The OldRawData is given an 80% weight which is added to the RawData having a 20% weight
// The OldRawData value is derived from original 0 value or created later in the code from the previous loop's FilterdData value
FilteredData=.8*OldRawData+.2*RawData;
// Setting up the serial port's readout format
// Open the Serial Monitor to view your data values (Tools / Serial Monitor)
// Open the Serial Plotter to view your data as a graph (Tools / Serial Plotter)
Serial.print("Raw Data (ms): ");
Serial.print(RawData);
Serial.print(", ");
Serial.print("Distance (cm): ");
Serial.print(Distance);
Serial.print(", ");
Serial.print("Filtered Data (ms): ");
Serial.print(FilteredData);
Serial.println();
// Mapping the buzzer's frequency range for the FilteredData range
// Creating a new variable called Sound (integer)
// Data range is between 50 and 2000
// Frequency range is between 120 and 1500 megahertz
// These values can be changed to suit your data and desired frequency ranges
int Sound = map(FilteredData, 50, 2000, 120, 1500);
// Sending the remapped data (Sound) to pin 7 (the buzzer)
tone(7, Sound, 0);
// Making the variable OldRawData equal to FilteredData to be used in the next loop (for the smoothing process)
OldRawData=FilteredData;
//Delay 10 millisecond (then repeat the loop)
delay(10);
}
//------------- Code Stops Here ----------------------------
Return to www.introductiontoarduino.com
|