The readout for this project consists of two lines; the first showing the distance in centimeters and the second showing the distance in inches. If you have not already done so, you need to install a library. These are easy to install and only need to be installed once. Go to Tools / Manage Libraries and search for (and install) LiquidCrystal.
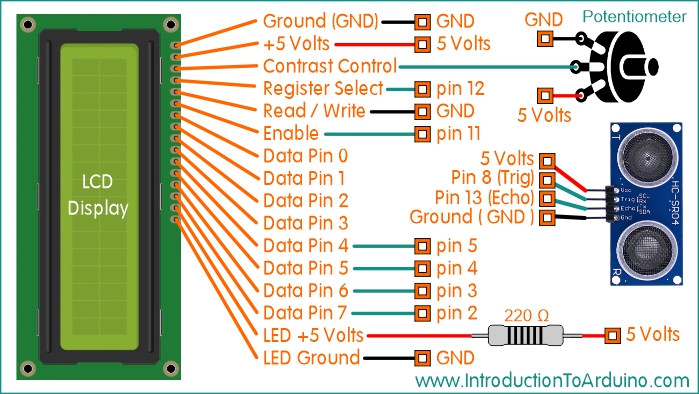
1 1602 (16x2) LCD Display 1 220 Ohm Resistor 1 Potentiometer 1 Arduino UNO R3 1 Breadboard Connector Wires
Code:
//------------- Code Starts Here ----------------------------

//-----------------------------------------
//Published by IntroductionToArduino.com
//Created by Paul Illsley (www.paulillsley.com)
//Please use and share so others can enjoy
//-----------------------------------------

// including the LiquidCrystal library
#include <LiquidCrystal.h>

// assigning LCD pins to arduino pin numbers
const int rs = 12;
const int en = 11;
const int d4 = 5;
const int d5 = 4;
const int d6 = 3;
const int d7 = 2;
LiquidCrystal lcd(rs, en, d4, d5, d6, d7);

// creating variables for the ultrasonic sensor data and assigning them to specific pins
int trigger_pin = 8;
int echo_pin = 13;

// creating variables for distance calculations to be preformed later
float duration;
float cm;
float inches;

void setup()
{
  // set up serial monitor at a baud rate of 9600
  Serial.begin (9600);

  // declaring the pin modes (trigger_pin and echo_pin) as either output or input
  pinMode(trigger_pin, OUTPUT);
  pinMode(echo_pin, INPUT);
}

void loop()
{
  // activating the ultrasonic sensor to collect pulse length data
  digitalWrite(trigger_pin, LOW);
  delayMicroseconds(1);
  digitalWrite(trigger_pin, HIGH);
  delayMicroseconds(1);
  digitalWrite(trigger_pin, LOW);

  // placing the pulse length data in the "duration" variable
  duration = pulseIn(echo_pin, HIGH);

  // calculate the distances from the pulse length data
  cm = (duration/2) / 29.1;
  inches = (duration/2) / 74;

  // sending the raw and calculated distances (cm and inches) to the serial monitor
  // you don’t need to use this section if you don’t want to view your data on your computer
  Serial.print("duration(ms):");
  Serial.print(duration);
  Serial.print(", cm:");
  Serial.print(cm);
  Serial.print(", inches:");
  Serial.print(inches);
  Serial.println();

  // declaring the number of columns and rows in the LCD (16 characters and 2 rows)
  lcd.begin(16, 2);

  // set the cursor location to column 0, line 0 (this is the first line)
  // print text with calculated distance (cm)
  lcd.setCursor(0, 0);
  lcd.print("cm = ");
  lcd.print(cm);

  // set the cursor location to column 0, line 1 (this is the second line)
  // print text with calculated distance (inches)
  lcd.setCursor(0, 1);
  lcd.print("inches = ");
  lcd.print(inches);

  // delay 1000 milliseconds (1 second) to make the display easier to read (you can change this value)
  delay(1000);
}
Return to www.introductiontoarduino.com
|